Case study: Measuring the hardness of soap

PRINCIPLE OF THE TEST
Comparison of the hardness of two soap formulations by penetration.
CONTEXT
The penetration test is an empirical test for the ease of penetration of soap. The results are influenced by the formulation of the product.
METHOD
Equipment :
Instruments: CTX with 50 kg load cell
Probe: TA-39 - 2 mm cylindrical probe
Accessory: TA-CJ - Confectionery jig, TA-BT-KIT- Lighting base table
Settings :
Type of test: Measuring Force in Compression
Pre-test speed: 1.0 mm / s
Test speed: 2.0 mm / s
Post-test speed: 10.0 mm / s
Target type: Distance
Target value: 8 mm
Trigger force: 30g
SAMPLE PREPARATION
Remove samples from storage and allow samples to equilibrate to test temperature (room temperature in this case).
PROCEDURE
Attach the 2mm cylindrical probe to the instrument
Place the fixture base table on the instrument base and tighten lightly with the thumbscrews to allow some degree of mobility
Place the confectionery jig on the fixture base table and tighten in position using the side screws.
Align the opening of the confectionery jig with the above probe by repositioning the base table and make sure that the probe can enter the opening of the confectionery jig without friction with the sides of the jig.
When alignment is complete, tighten the wing nuts on the fixture base table.
Place the sample in the confectionery jig so that it is aligned with the center of the mounting opening, then tighten in position using the four screws. Tightening must be done up to the point of first resistance of the sample. Any additional tightening will compress the sample.
Lower the probe approximately 5mm above the confectionery jig.
Start the penetration test.
After each test, clean the bottle probe before proceeding to the next test.
RESULTS
If the chosen bar of soap is curved, use a sharp blade (knife) to flatten the test surface if necessary. For comparison purposes, samples should be placed in the confectionery jig in the same orientation. The firmer sample is best tested first in order to anticipate the maximum testing range required for subsequent samples. This will ensure that the force capacity covers the range for other future samples. The penetration distance can be changed; however, the target distance chosen must be such that the probe does not touch the base of the container, otherwise the instrument will be overloaded. In addition, the resulting hardness values will increase with respect to increased penetration depths. Therefore, for comparison purposes, penetration distances should always be reported. The penetration test can also monitor hardness against temperatures that soap may be subjected to during transportation and storage. The test temperatures must therefore be reported in the results. The soap penetration test can also indicate if there are trapped air bubbles or a grainy texture considered fluctuations in force when the probe comes in contact with air bubbles or hard particles.
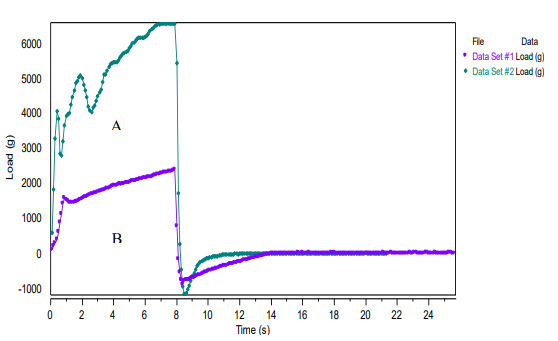
Graph of Figure IA comparing the hardness of two different bar soap formulations tested at 20oC.
Data set # 1: sample A (premium soap)
Data set # 2: sample B (budget soap)
OBSERVATIONS
When a trigger force of 10g is reached, the probe begins to penetrate the sample at a set distance (eg 8mm) at a set rate of 2mm / s. The highest peak value then becomes the force required to penetrate the sample the specified distance. The higher the value of the maximum force, the harder the sample. From Figure 1, sample A is significantly harder than sample B. The area below the graphs is a measure of the work done to penetrate the samples. This is the energy required to overcome the strength of the internal bonds within the sample. The table below shows the test results obtained from 6 bar soap samples of each formulation to give the following average values of fore and work done below:
| Hardness (g) | Hard work done |
| Sample A (Premium Soap) | 6087 ± 387 | 346.1 ± 59.8 |
| Sample B (Budget Soap) | 2421 ± 65 | 146.4 ± 5.5 |